Olimex A20-OlinuxIno-Micro Kernel compilé + Debian 9 + GPIO
Olimex A20-OlinuxIno-Micro avec kernel compilé , module RTC et disque SSD
Carte olimex A20-OlinuxIno-Micro


Matériel
- Carte olimex A20-OLinuXino-MICRO
- Bloc Alimentation 10V 1A
- Carte micro SD min 4GO
- SSD
- Batterie Li-ion 3.7v 5000mAh
Liens
- U-Boot wiki
- Device Tree
- Installing Debian On Allwinner
- HCL:A20-OLinuXino-MICRO
- Add a real-time clock to a Beaglebone Black
- Armbian Device Tree overlays
- sunxi-DT-overlays
- Topic: [HowTo] Enable full duplex SPI
- SPIdev
Compilation kernel + Debian Stretch
1
2
3
4
5
6
7
8
9
10
11
  ____                      _ _       _   _
 / ___|___  _ __ ___  _ __ (_) | __ _| |_(_) ___  _ __
| |   / _ \| '_ ` _ \| '_ \| | |/ _` | __| |/ _ \| '_ \
| |__| (_) | | | | | | |_) | | | (_| | |_| | (_) | | | |
 \____\___/|_| |_| |_| .__/|_|_|\__,_|\__|_|\___/|_| |_|
                     |_|
 _                        _
| | _____ _ __ _ __   ___| |
| |/ / _ \ '__| '_ \ / _ \ |
|   <  __/ |  | | | |  __/ |
|_|\_\___|_|  |_| |_|\___|_|
Compilation noyau linux pour processeur arm Carte olimex A20-OLinuXino-LIME et (MICRO)
Création dossier sur ~/media/dplus
1
2
3
4
5
6
7
8
9
10
11
12
13
14
15
16
17
18
19
20
21
22
23
24
25
26
27
28
29
30
31
32
33
34
35
36
37
38
39
40
41
42
43
44
45
46
47
48
49
50
51
52
53
54
55
56
57
58
59
60
61
62
63
64
65
66
67
68
69
70
71
72
73
74
75
76
77
78
79
80
81
82
83
84
85
86
87
88
89
90
91
92
93
94
95
96
97
98
99
100
101
102
103
104
105
106
107
108
109
110
111
112
113
114
115
116
117
118
119
120
121
122
123
124
125
126
127
# aller dans le dossier
cd ~/media/dplus/A20-OLinuXino-MICRO/

# ARM Cross Compiler: GCC

#This is a pre-built (64bit) version of Linaro GCC that runs on generic linux, sorry (32bit) x86 users, it's time to upgrade...
wget -c https://releases.linaro.org/components/toolchain/binaries/6.4-2018.05/arm-linux-gnueabihf/gcc-linaro-6.4.1-2018.05-x86_64_arm-linux-gnueabihf.tar.xz
tar xf gcc-linaro-6.4.1-2018.05-x86_64_arm-linux-gnueabihf.tar.xz
#


export CC=`pwd`/gcc-linaro-6.4.1-2018.05-x86_64_arm-linux-gnueabihf/bin/arm-linux-gnueabihf-

export CC=/home/yannick/media/dplus/A20-OLinuXino-MICRO/gcc-linaro-6.4.1-2018.05-x86_64_arm-linux-gnueabihf/bin/arm-linux-gnueabihf-


#Test Cross Compiler:
${CC}gcc --version

# arm-linux-gnueabihf-gcc (Linaro GCC 6.4-2018.05) 6.4.1 20180425
#  Copyright (C) 2017 Free Software Foundation, Inc.
#  This is free software; see the source for copying conditions.  There is NO
#  warranty; not even for MERCHANTABILITY or FITNESS FOR A PARTICULAR PURPOSE.

# Das U-Boot – the Universal Boot Loader: http://www.denx.de/wiki/U-Boot
git clone https://github.com/u-boot/u-boot
cd u-boot/
git checkout v2019.01 -b tmp

# A20-OLinuXino-MICRO
make ARCH=arm CROSS_COMPILE=${CC} distclean
make ARCH=arm CROSS_COMPILE=${CC} A20-OLinuXino_MICRO_defconfig
make ARCH=arm CROSS_COMPILE=${CC}

#If you see the following error when compiling on Arch Linux arm : "ImportError: No module named _libfdt"
# install dtc , sudo pacman -S dtc


# This script will build the kernel, modules, device tree binaries and copy them to the deploy directory.
cd ..
git clone https://github.com/RobertCNelson/armv7-lpae-multiplatform
cd armv7-lpae-multiplatform/

# For v4.17.x (Stable):
git checkout origin/v4.17.x -b tmp
# Build:
./build_kernel.sh

# https://www.linuxtopia.org/online_books/linux_kernel/kernel_configuration/ch09s05.html
# lvm dans le kernel

# Root File System
# Debian 9  debian/temppwd root/root
cd ..
wget -c https://rcn-ee.com/rootfs/eewiki/minfs/debian-9.8-minimal-armhf-2019-02-16.tar.xz
wget -c https://rcn-ee.com/rootfs/eewiki/minfs/debian-9.8-minimal-armhf-2019-02-16.tar.xz.sha256sum
# Verify:
sha256sum debian-9.8-minimal-armhf-2019-02-16.tar.xz
# Extract:
tar xf debian-9.8-minimal-armhf-2019-02-16.tar.xz

# Préparer SDcard
# For these instruction we are assuming, DISK=/dev/mmcblk0, lsblk is very useful for determining the device id.
export DISK=/dev/sde

#Erase partition table/labels on microSD card:
sudo dd if=/dev/zero of=${DISK} bs=1M count=10

#Install Bootloader:
sudo dd if=./u-boot/u-boot-sunxi-with-spl.bin of=${DISK} seek=8 bs=1024

#Create Partition Layout:
#With util-linux v2.26, sfdisk was rewritten and is now based on libfdisk.
#sudo sfdisk --version
#sfdisk from util-linux 2.27.1
#sfdisk >= 2.26.x

sudo sfdisk ${DISK} <<-__EOF__
1M,,L,*
__EOF__

#Format Partition:
#for: DISK=/dev/sdX
sudo mkfs.ext4 -L rootfs ${DISK}1

#Mount Partition:
#On most systems these partitions may will be auto-mounted...
sudo mkdir -p /media/rootfs/

#for: DISK=/dev/sdX
sudo mount ${DISK}1 /media/rootfs/

# version kernel
export kernel_version=$(cat armv7-lpae-multiplatform/kernel_version)
# copie root file system

sudo tar xfvp ./*-*-*-armhf-*/armhf-rootfs-*.tar -C /media/rootfs/
sync
sudo chown root:root /media/rootfs/
sudo chmod 755 /media/rootfs/

# Setup extlinux.conf
sudo mkdir -p /media/rootfs/boot/extlinux/
sudo sh -c "echo 'label Linux ${kernel_version}' > /media/rootfs/boot/extlinux/extlinux.conf"
sudo sh -c "echo '    kernel /boot/vmlinuz-${kernel_version}' >> /media/rootfs/boot/extlinux/extlinux.conf"
sudo sh -c "echo '    append root=/dev/mmcblk0p1 ro rootfstype=ext4 rootwait quiet' >> /media/rootfs/boot/extlinux/extlinux.conf"
sudo sh -c "echo '    fdtdir /boot/dtbs/${kernel_version}/' >> /media/rootfs/boot/extlinux/extlinux.conf"

#Copy Kernel Image
#Kernel Image:
sudo cp -v ./armv7-lpae-multiplatform/deploy/${kernel_version}.zImage /media/rootfs/boot/vmlinuz-${kernel_version}

#Copy Kernel Device Tree Binaries
sudo mkdir -p /media/rootfs/boot/dtbs/${kernel_version}/
sudo tar xfv ./armv7-lpae-multiplatform/deploy/${kernel_version}-dtbs.tar.gz -C /media/rootfs/boot/dtbs/${kernel_version}/

#Copy Kernel Modules
sudo tar xfv ./armv7-lpae-multiplatform/deploy/${kernel_version}-modules.tar.gz -C /media/rootfs/

#File Systems Table (/etc/fstab)
sudo sh -c "echo '/dev/sde1  /  auto  errors=remount-ro  0  1' >> /media/rootfs/etc/fstab"

#Remove microSD/SD card
sync
sudo umount /media/rootfs
Premier boot
On utilise une liaison USB/SERIAL et le logiciel minicom pour communiquer avec la carte olimex
1
sudo minicom
Login debian et mot de passe temppwd
On passe en mode su ,sudo -s
Changer le mot de passe root
1
passwd root
locales
1
dpkg-reconfigure locales
1
2
3
Generating locales (this might take a while)...
  fr_FR.UTF-8... done
Generation complete.
Créer un utilisateur temporaire
1
2
useradd -m -g users -c 'oli debian' -s /bin/bash oli
passwd oli
Se connecter en utilisateur oli
On passe en mode su
Renommer utilisateur debian en xo
1
2
usermod -l xo debian
usermod -d /home/xo -m xo
Cela change le nom d’utilisateur et tout le reste, comme le groupe, le répertoire d’accueil, l’UID restera le même.
Changer le mot de passe xo
1
passwd xo
Modifier sudoers pour accès sudo sans mot de passe à l’utilisateur xo
1
2
su
echo "xo     ALL=(ALL) NOPASSWD: ALL" >> /etc/sudoers
Mise à jour debian
1
apt update && apt upgrade
Supprimer utilisateur oli
1
userdel -r oli
Connexion via SSH
Se connecter depuis un poste du réseau :
1
ssh xo@192.168.0.43
id utilisateur xo
1
id
1
2
3
4
uid=1000(xo) gid=1000(debian) groupes=1000(debian),4(adm),15(kmem),20(dialout),24(cdrom),25(floppy),29(a
udio),30(dip),44(video),46(plugdev),100(users),101(systemd-journal),108(i2c),110(netdev),113(bluetooth),
991(cloud9ide),992(xenomai),993(weston-launch),994(tisdk),995(spi),996(admin),997(eqep),998(pwm),999(gpi
o)
Fuseau horaire Europe/Paris
1
sudo dpkg-reconfigure tzdata
1
2
3
Current default time zone: 'Europe/Paris'
Local time is now:      Fri Mar 15 08:48:43 CET 2019.
Universal Time is now:  Fri Mar 15 07:48:43 UTC 2019.
1
timedatectl
1
2
3
4
5
6
7
      Local time: ven. 2019-03-15 08:49:02 CET
  Universal time: ven. 2019-03-15 07:49:02 UTC
        RTC time: ven. 2019-03-15 07:49:03
       Time zone: Europe/Paris (CET, +0100)
 Network time on: yes
NTP synchronized: yes
 RTC in local TZ: no
LVM (Logical Volume Manager)
Installer le paquet
1
sudo apt install lvm2
Connecter un disque sata SSD M500 Crucial de 480Go
Création des partitions sur /dev/sda
1
sudo fdisk /dev/sda
1
2
3
4
5
# o table dos
# n partition 1 20G      83 Linux
# n partition 2 le reste
# t (partition 2) 8e Linux LVM
# w écriture et sortie
1
sudo fdisk -l /dev/sda
1
2
3
4
5
6
7
8
9
10
Disk /dev/sda: 447,1 GiB, 480103981056 bytes, 937703088 sectors
Units: sectors of 1 * 512 = 512 bytes
Sector size (logical/physical): 512 bytes / 4096 bytes
I/O size (minimum/optimal): 4096 bytes / 4096 bytes
Disklabel type: dos
Disk identifier: 0xc4bcac58

Device     Boot    Start       End   Sectors   Size Id Type
/dev/sda1           2048  41945087  41943040    20G 83 Linux
/dev/sda2       41945088 937703087 895758000 427,1G 8e Linux LVM
Création volume physique et logique lvm
1
2
3
4
sudo -s
pvcreate /dev/sda2
vgcreate ssd-m500 /dev/sda2          # créer volume ssd-m500
lvcreate -l 109345 -n lv500 ssd-m500  # créer volume logique lv-data
Format type de fichier
1
2
3
sudo -s
mkfs.ext4 /dev/sda1
mkfs.ext4 /dev/ssd-m500/lv500
Bascule du root SDcard sur le SSD
On passe en mode su
1
sudo -s
Montage temporaire de l’unité /dev/sda1
1
2
mkdir -p /mnt/temp  # création point de montage temporaire
mount /dev/sda1 /mnt/temp
Copie des fichiers systèmes avec exclusion de certains dossiers
1
/usr/bin/rsync -a --progress --exclude={"boot","dev/*","proc/*","sys/*","tmp/*","run/*","mnt/*","media/*","lost+found"} / /mnt/temp
Démontage
1
umount /mnt/temp
Modification du boot
Le dossier /boot reste sur la SDcard
Le dossier root / est sur le disque SSD /dev/sda1
1
2
rm /boot/extlinux/.extlinux.conf.swp  # supprimer le verrou
nano /boot/extlinux/extlinux.conf
Remplacer root=/dev/mmcblk0p1 ro par root=/dev/sda1 rw et sauver (Ctrl o et Ctrl x)
Arrêt de la maquette
1
poweroff
Avant de relancer la maquette, la connecter via une lisaison USB/SERIE et logiciel “minicom” pour analyser la phase de boot
1
2
3
4
5
6
7
8
9
10
11
12
13
14
15
16
17
18
19
20
21
22
23
[...]
Found /boot/extlinux/extlinux.conf
Retrieving file: /boot/extlinux/extlinux.conf
189 bytes read in 36 ms (4.9 KiB/s)
1:      Linux 4.17.17-armv7-lpae-x15
Retrieving file: /boot/vmlinuz-4.17.17-armv7-lpae-x15
8126976 bytes read in 475 ms (16.3 MiB/s)
append: root=/dev/sda1 rw rootfstype=ext4 rootwait quiet
Retrieving file: /boot/dtbs/4.17.17-armv7-lpae-x15/sun7i-a20-olinuxino-micro.dtb
40104 bytes read in 97 ms (403.3 KiB/s)
## Flattened Device Tree blob at 43000000
   Booting using the fdt blob at 0x43000000
EHCI failed to shut down host controller.
EHCI failed to shut down host controller.
   Loading Device Tree to 49ff3000, end 49fffca7 ... OK

Starting kernel ...

[    0.004863] /cpus/cpu@0 missing clock-frequency property
[    0.004912] /cpus/cpu@1 missing clock-frequency property
[FAILED] Failed to start Generic Board Startup.
See 'systemctl status generic-board-startup.service' for details.
[...]
Le root sur /dev/sda1 est bien pris en compte
Connexion utilisateur “xo” et vérification des points de montage parmount
Analyse des problèmes de boot
systemctl status generic-board-startup.service , le script est inexistant , on désactive le service: sudo systemctl disable generic-board-startup.service
Créer une SDcard de boot
Créer une SDcard bootable avec uniquement le dossier /boot et le root sur /dev/sda1
La SDcard peut être de taille faible (<= 4Go) et de “class” inérieur à 10
Insérer la SDcard dans un lecteur USB/SDcard ,et connecter sur le poste ayant servi à la compilation du kernel
Relever l’unité par dmesg
1
2
3
[...]
[ 8008.686470]  sde: sde1
[ 8008.690198] sd 4:0:0:0: [sde] Attached SCSI removable disk
Unité système /dev/sde
1
2
3
4
5
6
7
8
9
10
11
12
13
14
15
16
17
18
19
20
21
22
23
24
25
26
27
28
29
30
31
32
33
34
35
36
37
38
39
40
41
42
43
44
45
46
47
48
49
50
51
52
53
54
55
56
57
58
59
60
61
62
63
cd ~/media/dplus/A20-OLinuXino-MICRO/  # se position sur le dossier de compilation
export CC=`pwd`/gcc-linaro-6.4.1-2018.05-x86_64_arm-linux-gnueabihf/bin/arm-linux-gnueabihf-

### Préparer SDcard
# For these instruction we are assuming, DISK=/dev/mmcblk0, lsblk is very useful for determining the device id.
export DISK=/dev/sde

#Erase partition table/labels on microSD card:
sudo dd if=/dev/zero of=${DISK} bs=1M count=10

#Install Bootloader:
sudo dd if=./u-boot/u-boot-sunxi-with-spl.bin of=${DISK} seek=8 bs=1024

#Create Partition Layout:
#With util-linux v2.26, sfdisk was rewritten and is now based on libfdisk.
#sudo sfdisk --version
#sfdisk from util-linux 2.27.1
#sfdisk >= 2.26.x

sudo sfdisk ${DISK} <<-__EOF__
1M,,L,*
__EOF__

#Format Partition:
#for: DISK=/dev/sdX
sudo mkfs.ext4 -L rootfs ${DISK}1

#Mount Partition:
#On most systems these partitions may will be auto-mounted...
sudo mkdir -p /media/rootfs/

#for: DISK=/dev/sdX
sudo mount ${DISK}1 /media/rootfs/
### Fin préparation SDcard

# version kernel
export kernel_version=$(cat armv7-lpae-multiplatform/kernel_version)

# copie root file system
sudo tar xfvp ./*-*-*-armhf-*/armhf-rootfs-*.tar -C /media/rootfs/
sync

sudo chown root:root /media/rootfs/
sudo chmod 755 /media/rootfs/

# Setup extlinux.conf avec unité /dev/sda1
sudo mkdir -p /media/rootfs/boot/extlinux/
sudo sh -c "echo 'label Linux ${kernel_version}' > /media/rootfs/boot/extlinux/extlinux.conf"
sudo sh -c "echo '    kernel /boot/vmlinuz-${kernel_version}' >> /media/rootfs/boot/extlinux/extlinux.conf"
sudo sh -c "echo '    append root=/dev/mmcblk0p1 rw rootfstype=ext4 rootwait quiet' >> /media/rootfs/boot/extlinux/extlinux.conf"
sudo sh -c "echo '    fdtdir /boot/dtbs/${kernel_version}/' >> /media/rootfs/boot/extlinux/extlinux.conf"

#Copy Kernel Image
#Kernel Image:
sudo cp -v ./armv7-lpae-multiplatform/deploy/${kernel_version}.zImage /media/rootfs/boot/vmlinuz-${kernel_version}

#Copy Kernel Device Tree Binaries
sudo mkdir -p /media/rootfs/boot/dtbs/${kernel_version}/
sudo tar xfv ./armv7-lpae-multiplatform/deploy/${kernel_version}-dtbs.tar.gz -C /media/rootfs/boot/dtbs/${kernel_version}/

#Remove microSD/SD card
sync
sudo umount /media/rootfs
Insérer la SDcard dans la maquette A20-Olinuxino-MICRO et démarrer…
Hostname
Changer le nom
1
2
sudo hostnamectl set-hostname srvxo
hostnamectl status
1
2
3
4
5
6
7
   Static hostname: srvxo
         Icon name: computer
        Machine ID: 4552d3d1987da57b28f058f15c8aae61
           Boot ID: 4520edfe83454a9f9a61863276c1ab72
  Operating System: Debian GNU/Linux 9 (stretch)
            Kernel: Linux 4.17.17-armv7-lpae-x15
      Architecture: arm
Il faut modifier le fichier /etc/hosts , remplacer arm.localdomain par xoyize.xyz et arm par srvxo sinon erreur
1
sudo nano /etc/hosts
1
2
3
4
5
6
7
8
127.0.0.1	localhost
127.0.1.1	xoyize.xyz	srvxo

# The following lines are desirable for IPv6 capable hosts
::1     localhost ip6-localhost ip6-loopback
ff02::1 ip6-allnodes
ff02::2 ip6-allrouters
Après modification
1
2
3
hostname --fqdn

xoyize.xyz
Réseau
http://variwiki.com/index.php?title=Static_IP_Address
Par défaut connman est utilisé
1
systemctl status connman
1
2
3
4
5
6
7
● connman.service - Connection service
   Loaded: loaded (/lib/systemd/system/connman.service; enabled; vendor preset: enabled)
   Active: active (running) since Fri 2019-03-15 10:58:13 CET; 3h 26min ago
 Main PID: 262 (connmand)
    Tasks: 1 (limit: 4915)
   CGroup: /system.slice/connman.service
           └─262 /usr/sbin/connmand -n
On relève interface filaire
connmanctl services
*AO Wired ethernet_02c20940f22b_cable
On passe en statique
sudo connmanctl config ethernet_02c20940f22b_cable --ipv4 manual 192.168.0.43 255.255.255.0 192.168.0.254
sudo connmanctl config ethernet_02c20940f22b_cable --nameservers 9.9.9.9
NextHop Freebox permet d’attribuer une adresse IPV6
2a01:e34:eebf:df3::/64 fe80::c2:9ff:fe40:f22b
Debian Stretch A20-olinuxino-micro (compilation kernel)
IPV4 : 192.168.0.43
IPV6 : 2a01:e34:eebf:df3::1
Domaine : xoyize.xyz
sudo connmanctl config ethernet_02c20940f22b_cable --ipv6 manual 2a01:e34:eebf:df3::1 64 fe80::224:d4ff:fea6:aa20
Redémarrer la machine et se connecter via SSH
Vérifier adressage ip
1
ip addr
1
2
3
4
5
6
7
8
9
10
11
12
13
14
1: lo: <LOOPBACK,UP,LOWER_UP> mtu 65536 qdisc noqueue state UNKNOWN group default qlen 1000
    link/loopback 00:00:00:00:00:00 brd 00:00:00:00:00:00
    inet 127.0.0.1/8 scope host lo
       valid_lft forever preferred_lft forever
    inet6 ::1/128 scope host
       valid_lft forever preferred_lft forever
2: eth0: <BROADCAST,MULTICAST,DYNAMIC,UP,LOWER_UP> mtu 1500 qdisc mq state UP group default qlen 1000
    link/ether 02:c2:09:40:f2:2b brd ff:ff:ff:ff:ff:ff
    inet 192.168.0.43/24 brd 192.168.0.255 scope global eth0
       valid_lft forever preferred_lft forever
    inet6 2a01:e34:eebf:df3::1/64 scope global
       valid_lft forever preferred_lft forever
    inet6 fe80::c2:9ff:fe40:f22b/64 scope link
       valid_lft forever preferred_lft forever
Message erreur
[ 1281.828853] ICMPv6: RA: ndisc_router_discovery failed to add default route
Correction
désactiver l’annonce des routes
sudo nano /etc/sysctl.conf
Ajouter net.ipv6.conf.eth0.accept_ra=0
Puis sudo sysctl -p pour une validation immédiate
Domaine et certificats
Serveur , installer et renouveler les certificats SSL Let’s encrypt
Installation client acme
1
2
3
4
5
6
7
8
cd ~
sudo -s  # en mode super utilisateur
apt install netcat socat -y # prérequis
git clone https://github.com/Neilpang/acme.sh.git
cd acme.sh
./acme.sh --install # --nocron
cd ..
rm -rf acme.sh/
Génération des certificats
1
/root/.acme.sh/acme.sh --dns dns_ovh --issue --keylength ec-384 -d xoyize.xyz -d *.xoyize.xyz
1
2
3
4
[vendredi 15 mars 2019, 20:08:10 (UTC+0100)] Your cert is in  /root/.acme.sh/xoyize.xyz_ecc/xoyize.xyz.cer
[vendredi 15 mars 2019, 20:08:10 (UTC+0100)] Your cert key is in  /root/.acme.sh/xoyize.xyz_ecc/xoyize.xyz.key
[vendredi 15 mars 2019, 20:08:10 (UTC+0100)] The intermediate CA cert is in  /root/.acme.sh/xoyize.xyz_ecc/ca.cer
[vendredi 15 mars 2019, 20:08:10 (UTC+0100)] And the full chain certs is there:  /root/.acme.sh/xoyize.xyz_ecc/fullchain.cer
Connexion xoyize.xyz (srvxo) avec clés SSH
Pour éviter les blocages en sortie connexion SSH
sudo apt-get install libpam-systemd
Ajout clé publique shuttle.pub depuis poste appelant
1
scp ~/.ssh/xoyize.pub xo@192.168.0.43:/home/xo
Sur le poste distant création en mode utilisateur du dossier .ssh et des droits
1
2
mkdir ~/.ssh
chmod 700 ~/.ssh
Ajout de la clé publique
1
2
3
4
5
cat xoyize.pub >> ~/.ssh/authorized_keys
#modifier les droits
chmod 600 ~/.ssh/authorized_keys
#Effacer le fichier de la clé
rm xoyize.pub
Modification fichier configuration ssh
1
sudo nano /etc/ssh/sshd_config
1
2
Port 55035
PasswordAuthentication	no
On relance le serveur ssh
1
sudo systemctl restart sshd
Connexion
1
ssh xo@xoyize.xyz -p 55035 -i ~/.ssh/xoyize
Borg
En mode su
1
sudo -s
Installation BorgBackup en utilisant les dépôts “backports”
1
2
3
apt edit-sources # pour ajouter la ligne pour les dépôts "backports"

deb http://deb.debian.org/debian stretch-backports main contrib non-free
Votre fichier « /etc/apt/sources.list » a changé, veuillez lancer « apt-get update »
1
apt update
Installer borgbackup
1
apt -V -t=stretch-backports install borgbackup
Créer un point de montage srv pour les dépôts de sauvegarde
1
mkdir -p /srv/data
Ajouter au fichier /etc/fstab
1
/dev/ssd-m500/lv500   /srv/data   ext4    defaults	0	2
Montage manuel
1
mount -a
créer un utilisateur dédié aux sauvegardes avec son home :
1
useradd borg --create-home --home-dir /srv/data/borg-backups/
Créer le dossier qui contiendra les clés publiques des serveurs ayany un accès pour leur sauvegarde
1
mkdir -p /srv/data/borg-backups/.ssh
Créer le fichier qui contiendra les clés publiques
1
touch /srv/data/borg-backups/.ssh/authorized_keys
Ajouter à ce fichier les clés publiques…
Opération à effectuer sur les serveurs distants qui effectuent leur sauvegarde sur xoyize.xyz
Il faut supprimer le fichier des “serveurs connus”
sudo rm /root/.ssh/known_hosts
Puis lancer les commandes suivantes
1
2
3
4
5
6
7
8
9
10
11
12
13
14
set -e

BACKUP_DATE=`date +%Y-%m-%d-%Hh%M`
LOG_PATH=/var/log/borg-backup.log

export BORG_PASSPHRASE="`cat ~root/.borg/passphrase`"
export BORG_RSH='ssh -i /root/.ssh/yanspm_ed25519'
BORG_REPOSITORY=ssh://borg@xoyize.xyz:55035/srv/data/borg-backups/yanspm.com
BORG_ARCHIVE=${BORG_REPOSITORY}::${BACKUP_DATE}

borg create \
-v --stats --compression lzma,9 \
$BORG_ARCHIVE \
/bin /boot /etc /home /lib /lib64 /opt /root /sbin /srv /usr /var
Saisir “yes” à la question
1
2
3
The authenticity of host '[xoyize.xyz]:55035 ([2a01:e34:eebf:df3::1]:55035)' can't be established.
ECDSA key fingerprint is SHA256:mx9WOfQPFuwwlWfTCNJxhgw3HzCdlwleO9LwsmW1mtU.
Are you sure you want to continue connecting (yes/no)? yes
Vous devez avoir un message de ce type
1
2
3
4
5
6
7
8
9
10
11
12
13
14
15
16
17
Creating archive at "ssh://borg@xoyize.xyz:55035/srv/data/borg-backups/yanspm.com::2019-03-15-20h48"
------------------------------------------------------------------------------
Archive name: 2019-03-15-20h48
Archive fingerprint: 4b4bbb019635953c4af2f523e03794b0e3071a402e352f0e7c80b3b097571781
Time (start): Fri, 2019-03-15 20:49:11
Time (end):   Fri, 2019-03-15 20:49:48
Duration: 36.26 seconds
Number of files: 77105
Utilization of max. archive size: 0%
------------------------------------------------------------------------------
                       Original size      Compressed size    Deduplicated size
This archive:                3.76 GB              1.10 GB              4.30 MB
All archives:               51.14 GB             15.45 GB              1.37 GB

                       Unique chunks         Total chunks
Chunk index:                   79248              1075339
------------------------------------------------------------------------------
Le serveur distant est initialisé pour faire ces sauvegardes automatiquement (crontab)
Parefeu (iptables)
1
2
3
4
5
 ____                 __
|  _ \ __ _ _ __ ___ / _| ___ _   _
| |_) / _` | '__/ _ \ |_ / _ \ | | |
|  __/ (_| | | |  __/  _|  __/ |_| |
|_|   \__,_|_|  \___|_|  \___|\__,_|
Parefeu (firewall) iptables IPV4/IPV6 bureau/serveur
iptables est normalement installé par défaut sur les serveurs.Dans le cas contraire
1
sudo apt install iptables # debian/ubuntu
Enusuite au choix
Scénarion A
- Création d’un “service” init_firewall pour que le pare-feu soit lancé lors de la phase de boot du système.
- Script /usr/local/sbin/config_firewall pour le serveur
- Premier lancement /usr/local/sbin/config_firewall ,ensuite exécution automatique au démarrage
Scénario B
- Script /usr/local/sbin/config_firewall pour le serveur
- Commenter la dernière ligne
#/etc/init.d/init_firewall restartdu script précédent - Exécuter le script /usr/local/sbin/config_firewall
-
Installer le paquet iptables-persistent pour définir des règles persistantes après un reboot.
sudo apt install iptables-persistent
Pendant, l’installation du paquet, on vous est demande si vous souhaitez que les règles actuellement en cours d’utilisation soient enregistrées dans le fichier .
Valider Yes/Oui, pour IP V4 comme pour IP V6.
Nginx PHP Mariadb
1
2
3
4
5
6
7
8
9
10
11
 _   _       _              ____  _   _ ____ _____ ____
| \ | | __ _(_)_ __ __  __ |  _ \| | | |  _ \___  |___ \
|  \| |/ _` | | '_ \\ \/ / | |_) | |_| | |_) | / /  __) |
| |\  | (_| | | | | |>  <  |  __/|  _  |  __/ / /_ / __/
|_| \_|\__, |_|_| |_/_/\_\ |_|   |_| |_|_|   /_/(_)_____|
       |___/
 __  __            _       ____  ____
|  \/  | __ _ _ __(_) __ _|  _ \| __ )
| |\/| |/ _` | '__| |/ _` | | | |  _ \
| |  | | (_| | |  | | (_| | |_| | |_) |
|_|  |_|\__,_|_|  |_|\__,_|____/|____/
Il exite une version de nginx pour debian stretch
1
2
nginx -v
    nginx version: nginx/1.10.3
Supprimer le fichier par défaut
1
   sudo rm /etc/nginx/sites-enabled/default
Modifier le fichier /etc/nginx/nginx.conf
Commenter la ligne
# include /etc/nginx/sites-enabled/*;
Installer php7.2 OpenSSL et MariaDb
1
2
3
4
5
6
7
8
9
10
11
12
13
14
15
16
17
18
19
20
21
22
23
24
25
26
27
28
29
30
31
32
33
34
35
36
37
38
39
40
41
42
43
44
45
46
47
48
49
50
51
52
53
54
55
56
57
# PHP7.2
apt-get -y install apt-transport-https lsb-release ca-certificates
wget -O /etc/apt/trusted.gpg.d/php.gpg https://packages.sury.org/php/apt.gpg
sh -c 'echo "deb https://packages.sury.org/php/ $(lsb_release -sc) main" > /etc/apt/sources.list.d/php.list'
apt update
# Le paquet php7.2-mcrypt est inexistant (si besoin ,installer php7.1-mcrypt)
apt install php7.2 php7.2-fpm php7.2-mysql php7.2-curl php7.2-json php7.2-gd php7.2-tidy php7.2-intl php7.2-imagick php7.2-xml php7.2-mbstring php7.2-zip -y

# Contenu fichier /etc/nginx/conf.d/default.conf
# back slash pour prise en compte request_filename
cat > /etc/nginx/conf.d/default.conf << EOF
server {
    listen 80;
    listen [::]:80;
    root /var/www/ ;
        location ~* \.php$ {
           fastcgi_split_path_info ^(.+\.php)(/.+)$;
           fastcgi_pass unix:/run/php/php7.2-fpm.sock;   # PHP7.2
           fastcgi_index index.php;
           include fastcgi_params;
	       fastcgi_param   REMOTE_USER     $remote_user;
	       fastcgi_param   PATH_INFO       $fastcgi_path_info;
	       fastcgi_param   SCRIPT_FILENAME $request_filename;
        }
}
EOF

# test php
echo "<?php phpinfo(); ?>" > /var/www/index.php

# Réinitialiser
systemctl daemon-reload
# Activer nginx
systemctl enable nginx
# Relancer les services
systemctl restart nginx php7.2-fpm

#openssl
apt install openssl -y

# Installer MariaDb
apt install mariadb-server -y
# Générer un mot de passe pour mysql
echo $(head -c 12 /dev/urandom | openssl enc -base64) > /etc/mysql/mdp
# fichier sql
# http://www.dbnewz.com/2008/07/14/mysql_secure_installation-pratique-mais-non-parametrable/
cat > /tmp/mysql_secure.sql << EOF
UPDATE mysql.user SET Password=PASSWORD('$(cat /etc/mysql/mdp)') WHERE User='root';  /* Met à jour le password de l’utilisateur root */
DELETE FROM mysql.user WHERE User=''; /* Supprime les utilisateurs anonymes */
DELETE FROM mysql.user WHERE User='root' AND Host!='localhost'; /* Supprime la possibilité à un utilisateur root de se connecter à partir d’un serveur distant */
DROP DATABASE test; /* Supprime la base de données test */
DELETE FROM mysql.db WHERE Db=’test’ OR Db=’test_%’; /* Supprime les privilèges associés à la base test */
FLUSH PRIVILEGES; /* Applique les changements effectués précedemment concernant la gestion des droits */
EOF

# Exécuter la requête sql
mysql -uroot < /tmp/mysql_secure.sql
Config nginx
Créer des liens
1
2
sudo ln -s /root/.acme.sh/xoyize.xyz_ecc/fullchain.cer /etc/ssl/private/xoyize.xyz.fullchain.cer.pem;
sudo ln -s /root/.acme.sh/xoyize.xyz_ecc/xoyize.xyz.key /etc/ssl/private/xoyize.xyz.key.pem;
Le fichier de configuration /etc/nginx/conf.d/default.conf
1
2
3
4
5
6
7
8
9
10
11
12
13
14
15
16
17
18
19
20
21
22
23
24
25
26
27
28
29
30
31
32
33
34
35
36
37
38
39
40
41
42
43
44
45
46
47
48
49
50
51
52
53
54
55
56
57
server {
    listen 80;
    listen [::]:80;

    ## redirect http to https ##
    server_name xoyize.xyz *.xoyize.xyz;
    return  301 https://$server_name$request_uri;
}

server {
    listen 443 ssl http2;
    listen [::]:443 ssl http2;

    server_name xoyize.xyz;
    root /var/www/ ;

    ssl_certificate /etc/ssl/private/xoyize.xyz.fullchain.cer.pem;
    ssl_certificate_key /etc/ssl/private/xoyize.xyz.key.pem;
    ssl_session_timeout 5m;
    ssl_session_cache shared:SSL:50m;

    # As suggested by https://cipherli.st/
    ssl_ecdh_curve secp384r1;

    ssl_prefer_server_ciphers on;

    # Ciphers with intermediate compatibility
    #----------------------------------------
    # https://mozilla.github.io/server-side-tls/ssl-config-generator/?server=nginx-1.6.2&openssl=1.0.1t&hsts=yes&profile=intermediate
    ssl_protocols TLSv1 TLSv1.1 TLSv1.2;
    ssl_ciphers 'ECDHE-ECDSA-CHACHA20-POLY1305:ECDHE-RSA-CHACHA20-POLY1305:ECDHE-ECDSA-AES128-GCM-SHA256:ECDHE-RSA-AES128-GCM-SHA256:ECDHE-ECDSA-AES256-GCM-SHA384:ECDHE-RSA-AES256-GCM-SHA384:DHE-RSA-AES128-GCM-SHA256:DHE-RSA-AES256-GCM-SHA384:ECDHE-ECDSA-AES128-SHA256:ECDHE-RSA-AES128-SHA256:ECDHE-ECDSA-AES128-SHA:ECDHE-RSA-AES256-SHA384:ECDHE-RSA-AES128-SHA:ECDHE-ECDSA-AES256-SHA384:ECDHE-ECDSA-AES256-SHA:ECDHE-RSA-AES256-SHA:DHE-RSA-AES128-SHA256:DHE-RSA-AES128-SHA:DHE-RSA-AES256-SHA256:DHE-RSA-AES256-SHA:ECDHE-ECDSA-DES-CBC3-SHA:ECDHE-RSA-DES-CBC3-SHA:EDH-RSA-DES-CBC3-SHA:AES128-GCM-SHA256:AES256-GCM-SHA384:AES128-SHA256:AES256-SHA256:AES128-SHA:AES256-SHA:DES-CBC3-SHA:!DSS';

    # Follows the Web Security Directives from the Mozilla Dev Lab and the Mozilla Obervatory + Partners
    # https://wiki.mozilla.org/Security/Guidelines/Web_Security
    # https://observatory.mozilla.org/
    add_header Strict-Transport-Security "max-age=63072000; includeSubDomains; preload";
    add_header Content-Security-Policy "upgrade-insecure-requests";
    add_header Content-Security-Policy-Report-Only "default-src https: data: 'unsafe-inline' 'unsafe-eval'";
    add_header X-Content-Type-Options nosniff;
    add_header X-XSS-Protection "1; mode=block";
    add_header X-Download-Options noopen;
    add_header X-Permitted-Cross-Domain-Policies none;
    add_header X-Frame-Options "SAMEORIGIN";

    index index.php index.html;
        location ~* \.php$ {
           fastcgi_split_path_info ^(.+\.php)(/.+)$;
           fastcgi_pass unix:/run/php/php7.2-fpm.sock;   # PHP7.2
           fastcgi_index index.php;
           include fastcgi_params;
	       fastcgi_param   REMOTE_USER     $remote_user;
	       fastcgi_param   PATH_INFO       $fastcgi_path_info;
	       fastcgi_param   SCRIPT_FILENAME $request_filename;
        }
    access_log /var/log/nginx/xoyize.xyz-access.log;
    error_log /var/log/nginx/xoyize.xyz-error.log;
}
Vérifier et relancer nginx
1
2
sudo nginx -t
sudo systemctl restart nginx
Control GPIO, I2C and SPI on A20-OLinuXino-MICRO
Control GPIO, I2C and SPI on A20-OLinuXino-MICRO
Installer python-pip
1
sudo apt install python-pip
Vérifier
1
pip -V
1
pip 9.0.1 from /usr/lib/python2.7/dist-packages (python 2.7)
The package pyA20 provide methods for controlling GPIO pins, I2C and SPI buses. It’s written for A20-OLinuXino-MICRO, but it can be used with other boards. In this case proper operation is not guaranteed. You can check wiki for more information.
1
pip install pyA20
1
2
3
4
5
6
7
8
Collecting pyA20
  Downloading https://files.pythonhosted.org/packages/dd/c2/ec7b33d0aacd1037635a50c5b6d238453415de2fd417de13d5d1545cb6d8/pyA20-0.2.12.tar.gz
Building wheels for collected packages: pyA20
  Running setup.py bdist_wheel for pyA20 ... done
  Stored in directory: /home/oli/.cache/pip/wheels/df/f9/ae/785545360d5558cf3589d53bb4ed0e79b7c94c9b3fac502641
Successfully built pyA20
Installing collected packages: pyA20
Successfully installed pyA20-0.2.12
Notes:When using GPIO make sure that the desired gpio is not used by another periphery.
Using this library requires root access.
GPIO methods
The following methods are available:
- init() - Make initialization of the module. Must be called first.
- getcfg() - Read current configuration of gpio.
- setcfg() - Write configuration to gpio.
- input() - Return current value of gpio.
- output() - Set output value.
- pullup() - Set pull-up/pull-down.
The available constants are:
- HIGH - 1
- LOW - 0
- INPUT - 0
- OUPTUT - 1
- PULLUP - 1
- PULLDOWN - 2
The gpio are named two ways:
- By port name: PH0, PG2, PE10, etc. These can be imported from port module:
1
2
>>> from pyA20.gpio import port
>>> dir(port)
- By connector name and pin number: gpio2p12, gpio3p8, lcdp18, uext1p3 and etc:
1
2
>>> from pyA20.gpio import connector
>>> dir(connector)
Generally these constants are just an offset in the memory from the base GPIO address, so they can be assigned to a number type variable.
1
2
3
>>> led = port.PH2
>>> print led
226
GPIO example consist of:
- Initialize gpio module
- Initialize one gpio as output and another one as input
- Polling input state and write corresponding output value
1
2
3
4
5
6
7
8
9
10
11
12
13
14
15
16
17
18
19
20
21
22
23
24
25
#!/usr/bin/env python

from pyA20.gpio import gpio
from pyA20.gpio import port
from pyA20.gpio import connector

gpio.init() #Initialize module. Always called first

gpio.setcfg(port.PG9, gpio.OUTPUT)  #Configure LED1 as output
gpio.setcfg(port.PG9, 1)    #This is the same as above

gpio.setcfg(port.PE11, gpio.INPUT)   #Configure PE11 as input
gpio.setcfg(port.PE11, 0)   #Same as above

gpio.pullup(port.PE11, 0)   #Clear pullups
gpio.pullup(port.PE11, gpio.PULLDOWN)    #Enable pull-down
gpio.pullup(port.PE11, gpio.PULLUP)  #Enable pull-up

while True:
        if gpio.input(port.PE11) == 1:
                gpio.output(port.PG9, gpio.LOW)
                gpio.output(port.PG9, 0)
        else:
                gpio.output(port.PG9, gpio.HIGH)
                gpio.output(port.PG9, 1)
I2C methods
- init() - Make initialization of the module
- open() - Begin communication with slave device
- read() - Read from slave device
- write() - Write data to slave device
- close() - End communication with slave device
I2C example:
- I2C module is imported
- Bus number 2 is opened
- Some data is written, then verified
1
2
3
4
5
6
7
8
9
10
11
12
13
14
15
16
#!/usr/bin/env python

from pyA20.i2c import i2c

i2c.init("/dev/i2c-2")  #Initialize module to use /dev/i2c-2
i2c.open(0x55)  #The slave device address is 0x55

#If we want to write to some register
i2c.write([0xAA, 0x20]) #Write 0x20 to register 0xAA
i2c.write([0xAA, 0x10, 0x11, 0x12]) #Do continuous write with start address 0xAA

#If we want to do write and read
i2c.write([0xAA])   #Set address at 0xAA register
value = i2c.read(1) #Read 1 byte with start address 0xAA

i2c.close() #End communication with slave device
SPI methods
- open() - Open SPI bus with given configuration
- read() - Read data from slave device without write
- write() - Write data to slave device without read
- xfer() - Do write and after that read
- close() - Close SPI bus
SPI example:
- SPI module is imported
- Bus 2 with chip-select 0 is opened
- Some data is transfered to slave device
1
2
3
4
5
6
7
8
9
10
11
12
13
14
15
16
17
18
19
20
21
22
#!/usr/bin/env python

from pyA20.spi import spi

spi.open("/dev/spidev2.0")
#Open SPI device with default settings
# mode : 0
# speed : 100000kHz
# delay : 0
# bits-per-word: 8

#Different ways to open device
spi.open("/dev/spidev2.0", mode=1)
spi.open("/dev/spidev2.0", mode=2, delay=0)
spi.open("/dev/spidev2.0", mode=3, delay=0, bits_per_word=8)
spi.open("/dev/spidev2.0", mode=0, delay=0, bits_per_word=8, speed=100000)

spi.write([0x01, 0x02]) #Write 2 bytes to slave device
spi.read(2) #Read 2 bytes from slave device
spi.xfer([0x01, 0x02], 2)   #Write 2 byte and then read 2 bytes.

spi.close() #Close SPI bus
Controler la charge de la batterie
La documentation AXP209
APX209 (pdf)

1
nano ~/battinfo.sh
1
2
3
4
5
6
7
8
9
10
11
12
13
14
15
16
17
18
19
20
21
22
23
24
25
26
27
28
29
30
31
32
33
34
35
36
37
38
39
40
41
42
43
44
45
46
47
48
49
50
51
52
53
54
55
56
57
58
59
60
61
62
63
64
65
66
67
68
69
70
71
72
73
74
75
76
77
78
79
80
81
82
83
84
85
86
87
88
89
90
91
#!/bin/sh
# This program gets the battery info from PMU
# Voltage and current charging/discharging
#
# Nota : temperature can be more than real because of self heating
#######################################################################
# Copyright (c) 2014 by RzBo, Bellesserre, France
#
# Permission is granted to use the source code within this
# file in whole or in part for any use, personal or commercial,
# without restriction or limitation.
#
# No warranties, either explicit or implied, are made as to the
# suitability of this code for any purpose. Use at your own risk.
#######################################################################

# force ADC enable for battery voltage and current
i2cset -y -f 1 0x34 0x82 0xC3

################################
#read Power status register @00h
POWER_STATUS=$(i2cget -y -f 1 0x34 0x00)
#echo $POWER_STATUS

BAT_STATUS=$(($(($POWER_STATUS&0x02))/2))  # divide by 2 is like shifting rigth 1 times
#echo $(($POWER_STATUS&0x02))
echo "BAT_STATUS="$BAT_STATUS
# echo $BAT_STATUS

################################
#read Power OPERATING MODE register @01h
POWER_OP_MODE=$(i2cget -y -f 1 0x34 0x01)
#echo $POWER_OP_MODE

CHARG_IND=$(($(($POWER_OP_MODE&0x40))/64))  # divide by 64 is like shifting rigth 6 times
#echo $(($POWER_OP_MODE&0x40))
echo "CHARG_IND="$CHARG_IND
# echo $CHARG_IND

BAT_EXIST=$(($(($POWER_OP_MODE&0x20))/32))  # divide by 32 is like shifting rigth 5 times
#echo $(($POWER_OP_MODE&0x20))
echo "BAT_EXIST="$BAT_EXIST
# echo $BAT_EXIST

################################
#read Charge control register @33h
CHARGE_CTL=$(i2cget -y -f 1 0x34 0x33)
echo "CHARGE_CTL="$CHARGE_CTL
# echo $CHARGE_CTL

################################
#read Charge control register @34h
CHARGE_CTL2=$(i2cget -y -f 1 0x34 0x34)
echo "CHARGE_CTL2="$CHARGE_CTL2
# echo $CHARGE_CTL2

################################
#read battery voltage    79h, 78h    0 mV -> 000h,    1.1 mV/bit    FFFh -> 4.5045 V
BAT_VOLT_LSB=$(i2cget -y -f 1 0x34 0x79)
BAT_VOLT_MSB=$(i2cget -y -f 1 0x34 0x78)

#echo $BAT_VOLT_MSB $BAT_VOLT_LSB

BAT_BIN=$(( $(($BAT_VOLT_MSB << 4)) | $(($(($BAT_VOLT_LSB & 0xF0)) >> 4)) ))

BAT_VOLT=$(echo "($BAT_BIN*1.1)"|bc)
echo "Battery voltage = "$BAT_VOLT"mV"

###################
#read Battery Discharge Current    7Ah, 7Bh    0 mV -> 000h,    0.5 mA/bit    FFFh -> 4.095 V
BAT_IDISCHG_LSB=$(i2cget -y -f 1 0x34 0x7B)
BAT_IDISCHG_MSB=$(i2cget -y -f 1 0x34 0x7A)

#echo $BAT_IDISCHG_MSB $BAT_IDISCHG_LSB

BAT_IDISCHG_BIN=$(( $(($BAT_IDISCHG_MSB << 4)) | $(($(($BAT_IDISCHG_LSB & 0xF0)) >> 4)) ))

BAT_IDISCHG=$(echo "($BAT_IDISCHG_BIN*0.5)"|bc)
echo "Battery discharge current = "$BAT_IDISCHG"mA"

###################
#read Battery Charge Current    7Ch, 7Dh    0 mV -> 000h,    0.5 mA/bit    FFFh -> 4.095 V
BAT_ICHG_LSB=$(i2cget -y -f 1 0x34 0x7D)
BAT_ICHG_MSB=$(i2cget -y -f 1 0x34 0x7C)

#echo $BAT_ICHG_MSB $BAT_ICHG_LSB

BAT_ICHG_BIN=$(( $(($BAT_ICHG_MSB << 4)) | $(($(($BAT_ICHG_LSB & 0xF0)) >> 4)) ))

BAT_ICHG=$(echo "($BAT_ICHG_BIN*0.5)"|bc)
echo "Battery charge current = "$BAT_ICHG"mA"
power_status.sh
1
2
3
4
5
6
7
8
9
10
11
12
13
14
15
16
17
18
19
20
21
22
23
24
25
26
27
#!/bin/sh
# This program gets the power status (AC IN or BAT)
# I2C interface with AXP209
#
#######################################################################
# Copyright (c) 2014 by RzBo, Bellesserre, France
#
# Permission is granted to use the source code within this
# file in whole or in part for any use, personal or commercial,
# without restriction or limitation.
#
# No warranties, either explicit or implied, are made as to the
# suitability of this code for any purpose. Use at your own risk.
#######################################################################
#read Power status register @00h
POWER_STATUS=$(i2cget -y -f 1 0x34 0x00)
#echo $POWER_STATUS
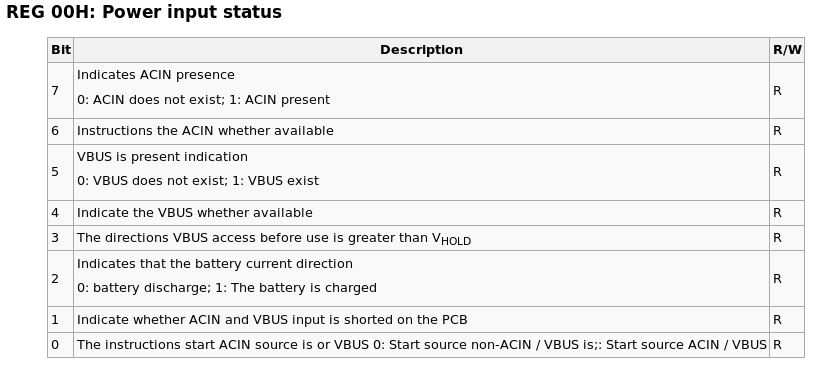
# bit 7 : Indicates ACIN presence 0: ACIN does not exist; 1: ACIN present
#echo "bit 7 : Indicates ACIN presence 0: ACIN does not exist; 1: ACIN present"
#echo "bit 2 : Indicates that the battery current direction 0: battery discharge; 1: The battery is charged"
AC_STATUS=$(($(($POWER_STATUS&0x80))/128)) # divide by 128 is like shifting rigth 8 times
#echo $(($POWER_STATUS&0x80))
echo "AC_STATUS="$AC_STATUS
# echo $AC_STATUS
Lancement des scripts python
1
2
3
4
5
6
7
8
9
10
11
sudo -s
./battinfo.sh
0xc5
BAT_STATUS=0
CHARG_IND=0
BAT_EXIST=1
CHARGE_CTL=0xc9
CHARGE_CTL2=0x45
Battery voltage = 3449.6mV
Battery discharge current = 0mA
Battery charge current = 0mA
Module I2C RTC DS1307 (Real Time Clock)
Liaisons entre le connecteur UEXT1 de la carte A20-Olinuxino-MICRO et le module RTC DS1307 (5v) ou DS1338 (3.3v)
| UEXT1 | Module RTC |
|---|---|
| 1 : +3.3v | Vcc |
| 2 : GND | GND |
| 5 : SCK | SCL |
| 6 : SDA | SDA |
ATTENTION : Utilisation du bus i2c-2
Les i2c sur le système
ls /dev/i2c*
/dev/i2c-0 /dev/i2c-1 /dev/i2c-2
i2c-tools
Installation outil de test et vérification bus i2c
sudo apt install i2c-tools
Les bus détectés
sudo i2cdetect -l
1
2
3
4
i2c-3	i2c       	mv64xxx_i2c adapter             	I2C adapter
i2c-1	i2c       	mv64xxx_i2c adapter             	I2C adapter
i2c-2	i2c       	mv64xxx_i2c adapter             	I2C adapter
i2c-0	i2c       	sun4i_hdmi_i2c adapter          	I2C adapter
Le module est connecté sur le bus 3
sudo i2cdetect -y 3
1
2
3
4
5
6
7
8
9
     0  1  2  3  4  5  6  7  8  9  a  b  c  d  e  f
00:          -- -- -- -- -- -- -- -- -- -- -- -- --
10: -- -- -- -- -- -- -- -- -- -- -- -- -- -- -- --
20: -- -- -- -- -- -- -- -- -- -- -- -- -- -- -- --
30: -- -- -- -- -- -- -- -- -- -- -- -- -- -- -- --
40: -- -- -- -- -- -- -- -- -- -- -- -- -- -- -- --
50: -- -- -- -- -- -- -- -- -- -- -- -- -- -- -- --
60: -- -- -- -- -- -- -- -- 68 -- -- -- -- -- -- --
70: -- -- -- -- -- -- -- --
On voit que le RPi a détecté un composant à l’adresse 0x68 qui d’après la doc constructeur est l’adresse par défaut.Il faut un élément logiciel pour le contrôler (pilote).
Pilote du module DS1307
Le bus i2c et le pilote ds1307 sont actifs dans la configuration du kernel compilé précédemment, sinon
1
2
3
4
5
6
7
8
9
10
#
# I2C support
#
CONFIG_I2C=y

#
# I2C RTC drivers
#
CONFIG_RTC_DRV_DS1307=y
Chargement du module DS1307
Charger le module
sudo modprobe rtc_ds1307
Préciser l’adresse du composant 0x68
sudo -s
echo "ds1307 0x68" > /sys/class/i2c-adapter/i2c-3/new_device
On vient d’associer l’adresse 0x68 au pilote rtc_ds1307
Vérification
dmesg | tail
1
2
[ 1283.720988] rtc-ds1307 3-0068: registered as rtc1
[ 1283.721283] i2c i2c-3: new_device: Instantiated device ds1307 at 0x68
Le circuit est pris en charge et est utilisé par le système pour servir de première horloge temps réel sous la forme du fichier /dev/rtc1
Mise à l’heure
On va mettre à l’heure le module avec celle du système (à jour si connecté sur le réseau via ntp)
hwclock -f /dev/rtc1 -w
Lecture de l’heure sur le module
hwclock -f /dev/rtc1 -r
1
2018-11-09 09:16:59.240428+0100
Chargement automatique
- Au démarrage on associe l’adresse 0x68 au pilote rtc_ds1307 par le biais du fichier /etc/rc.local
- Puis on ajuste l’heure système à celle de l’horloge matérielle
Depuis la version 9 de Debian (Stretch), le script de démarrage rc.local n’existe plus, solution de contournement en utilisant Systemctl.
Créer le fichier suivant /etc/systemd/system/rc-local.service
1
sudo nano /etc/systemd/system/rc-local.service
Copier le code suivant dans le fichier créé précédemment
1
2
3
4
5
6
7
8
9
10
11
12
13
14
[Unit]
Description=/etc/rc.local Compatibility
ConditionPathExists=/etc/rc.local

[Service]
Type=forking
ExecStart=/etc/rc.local start
TimeoutSec=0
StandardOutput=tty
RemainAfterExit=yes
SysVStartPriority=99

[Install]
WantedBy=multi-user.target
Créer le fichier /etc/rc.local
1
sudo nano /etc/rc.local
1
2
3
4
5
6
7
8
9
10
11
12
13
14
15
16
17
18
19
20
#!/bin/sh -e
#
# rc.local
#
# This script is executed at the end of each multiuser runlevel.
# Make sure that the script will "exit 0" on success or any other
# value on error.
#
# In order to enable or disable this script just change the execution
# bits.
#
# By default this script does nothing.

I2CDIR=/sys/class/i2c-adapter/i2c-3
if [ -d "$I2CDIR" ]; then
 echo "ds1307 0x68" > $I2CDIR/new_device
 hwclock -f /dev/rtc1 -s
fi

exit 0
Le chemin est stocké dans une variable I2CDIR et est utilisée pour tester si le répertoire existe :
- Dans le cas où il n’existe pas ,cela signifie que le pilote pour le support i2c ne s’est pas chargé .
- Si le répertoire existe ,la commande est exécuter pour déclarer le composant sur le bus et mettre à jour l’heure système
Ajouter l’autorisation d’exécution au script /etc/rc.local créer précédemment
sudo chmod +x /etc/rc.local
Finalement, activer le nouveau service rc-local au démarrage de votre serveur
1
2
sudo systemctl enable rc-local
sudo systemctl daemon-reload
Désormais, lorsque votre serveur Linux va démarrer, le script rc.local que vous venez de créer sera exécuté.