_Debian-Stretch-VirtualBox-ouestline.net-nginx-php7.2-mariadb-tlsv1.3
_Debian-Stretch-VirtualBox-ouestline.net-nginx-php7.2-mariadb-tlsv1.3
layout: article
title: Debian Stretch VirtualBox (dbs) ouestline.net nginx TLSv1.3
date: 2018-12-03 00:00:00 +0100
—
Debian Stretch VirtualBox

- Serveur virtuel 64 bits VirtualBox : Debian Stretch
- machine : dbs
- domaine :
- root : ytreu49
- Utilisateur : dbsuser
- Mot de passe : dbsuser49
- Adresse IP : 192.168.0.47
- Accès
- SSH : ssh dbsuser@192.168.0.47
- SSH + clé : ssh -i ~/.ssh/vbox-dbs-ed25519 dbsuser@192.168.0.47 (non actif)
- Transfert de fichier : scp -P 55022 -i ~/.ssh/stretch fichiera fichierb dbsuser@192.168.0.47:/home/dbsuser (non actif)
- Mot de passe root mariadb : mariadb49
Le domaine ouestline.net pointe sur l’adresse IPV6 2a01:e34:ee6a:b274::1
Connexion SSH
1
ssh dbsuser@192.168.0.47
Passer en root
1
su # sudo -s
Mise à jour
1
apt update && apt upgrade -y
Installer sudo
1
apt install sudo
Visudo pour les accès root via utilisateur dbsuser
1
echo "dbsuser     ALL=(ALL) NOPASSWD: ALL" >> /etc/sudoers
Connexion ssh avec clé
Ajouter la clé publique au fichier ~/.ssh/authorized_keys
Droit en lecture utilisateur uniquement, chmod 400 ~/.ssh/authorized_keys
Modification configuration serveur ssh , /etc/ssh/sshd_config
-> PasswordAuthentication no
Relancer le service
VBox Additions Invité/Debian
Préalable
Configurer votre machine virtuelle pour un accès au réseau partagé.
'’Configuration’’ –> ‘‘Dossiers partagés’‘
Ajouter le dossier et cocher '’Montage automatique’‘
Installer les additions client dans un Debian en cours d’exécution dans une machine virtuelle.
- Installez gcc ,make et kernel headers (installateur a besoin d’eux pour construire le module du noyau):
sudo apt install gcc make linux-headers-$(uname -r)
- Allez dans le menu '’Périphériques’’ –> ‘‘Insérer l’image des additions invité…’‘ de la machine virtuelle en cours d’exécution ,si non présent , le télécharger.
- Monter le cd dans la machine virtuelle :
sudo mount /dev/cdrom /media/cdrom - Allez dans le dossier monté :
cd /media/cdrom - Exécutez :
sudo ./VBoxLinuxAdditions.run- Pas d’environnement graphique : ne pas tenir compte de l'erreur '’Could not find the X.Org or XFree86 Window System, skipping.’‘
- Il faut ajouter le group vboxsf à votre utilisateur :
sudo usermod -a -G vboxsf $USER - Pour la prise en compte, redémarrer la machine virtuelle :
sudo reboot
/media/ est le répertoire qui contient le(s) dossier(s) partagé(s)
Gestion machine virtuelle VM
Démarrer la machine virtuelle VM en ligne de commande sans interface graphique VirtualBox
1
VBoxManage startvm "Debian Stretch" --type headless
Arrêter une VM
1
VBoxManage controlvm "Debian Stretch" poweroff
Mettre en pause une VM
1
VBoxManage controlvm "Debian Stretch" pause
Réinitialiser une VM
1
VBoxManage controlvm "Debian Stretch" reset
En savoir plus sur VBoxHeadless, regardez
1
VBoxHeadless --help
Adressage ipv6
Réseau actuel
1
ip addr
1
2
3
4
5
6
7
8
2: enp0s3: <BROADCAST,MULTICAST,UP,LOWER_UP> mtu 1500 qdisc pfifo_fast state UP group default qlen 1000
    link/ether 08:00:27:a1:75:8e brd ff:ff:ff:ff:ff:ff
    inet 192.168.0.47/24 brd 192.168.0.255 scope global enp0s3
       valid_lft forever preferred_lft forever
    inet6 2a01:e34:ee6a:b270:a00:27ff:fea1:758e/64 scope global mngtmpaddr dynamic
       valid_lft 86089sec preferred_lft 86089sec
    inet6 fe80::a00:27ff:fea1:758e/64 scope link
       valid_lft forever preferred_lft forever
La carte n’est joignable de l’internet que par son adresse IPV6
NextHop Freebox permet d’attribuer une adresse IPV6
Adresse IPV6 Box fe80::224:d4ff:fea6:aa20
Préfixe 2a01:e34:ee6a:b274::/64
NextHop fe80::a00:27ff:fea1:758e
1
sudo nano /etc/network/interfaces
1
2
3
4
5
6
7
8
9
10
11
12
13
14
15
16
17
18
19
# This file describes the network interfaces available on your system
# and how to activate them. For more information, see interfaces(5).

source /etc/network/interfaces.d/*

# The loopback network interface
auto lo
iface lo inet loopback

# The primary network interface
allow-hotplug enp0s3
iface enp0s3 inet dhcp
# This is an autoconfigured IPv6 interface
# iface enp0s3 inet6 auto
iface enp0s3 inet6 static
  address 2a01:e34:ee6a:b274::1
  netmask 64
  post-up ip -6 route add default via fe80::224:d4ff:fea6:aa20 dev enp0s3
Redémarrer la machine
1
sudo systemctl reboot
Vérifier l’adresse inet6
1
ip addr
1
2
3
4
5
6
7
8
9
10
2: enp0s3: <BROADCAST,MULTICAST,UP,LOWER_UP> mtu 1500 qdisc pfifo_fast state UP group default qlen 1000
    link/ether 08:00:27:a1:75:8e brd ff:ff:ff:ff:ff:ff
    inet 192.168.0.47/24 brd 192.168.0.255 scope global enp0s3
       valid_lft forever preferred_lft forever
    inet6 2a01:e34:ee6a:b274::1/64 scope global tentative dadfailed
       valid_lft forever preferred_lft forever
    inet6 2a01:e34:ee6a:b270:a00:27ff:fea1:758e/64 scope global mngtmpaddr dynamic
       valid_lft 84708sec preferred_lft 84708sec
    inet6 fe80::a00:27ff:fea1:758e/64 scope link
       valid_lft forever preferred_lft forever
Nginx + PHP7 + MariaDB

Debian Stretch compilation nginx avec modules dynamiques et TLSv1.3 + PHP7.2 + MariaDB
DNS
![]()
Le domaine ouestline.net pointe sur l’adresse IPV6 2a01:e34:ee6a:b274::1
depuis un poste distant
ping -6 -c5 2a01:e34:ee6a:b274::1
ping -6 -c5 ouestline.net
OVH
1
2
3
4
5
6
7
$TTL 3600
@	IN SOA dns111.ovh.net. tech.ovh.net. (2018110102 86400 3600 3600000 300)
         3600 IN NS     ns111.ovh.net.
         3600 IN NS     dns111.ovh.net.
         3600 IN AAAA   2a01:e34:ee6a:b274::1
blog     3600 IN CNAME  ouestline.net.
static   3600 IN CNAME  ouestline.net.
Certificats Letsencrypt
Passer en root (su, sudo)
Génération des certificats
/root/.acme.sh/acme.sh --dns dns_ovh --issue --keylength 4096 -d ouestline.net
1
2
3
4
[lundi 22 octobre 2018, 18:39:48 (UTC+0200)] Your cert is in  /root/.acme.sh/ouestline.net/ouestline.net.cer
[lundi 22 octobre 2018, 18:39:48 (UTC+0200)] Your cert key is in  /root/.acme.sh/ouestline.net/ouestline.net.key
[lundi 22 octobre 2018, 18:39:48 (UTC+0200)] The intermediate CA cert is in  /root/.acme.sh/ouestline.net/ca.cer
[lundi 22 octobre 2018, 18:39:48 (UTC+0200)] And the full chain certs is there:  /root/.acme.sh/ouestline.net/fullchain.cer
Création des liens
1
2
ln -s /root/.acme.sh/ouestline.net/fullchain.cer /etc/ssl/private/ouestline.net.fullchain.cer.pem
ln -s /root/.acme.sh/ouestline.net/ouestline.net.key /etc/ssl/private/ouestline.net.key.pem
Configuration nginx
sudo -s
Fichier de configuration nginx
rm /etc/nginx/conf.d/default.conf
nano /etc/nginx/conf.d/default.conf
1
2
3
4
5
6
7
8
9
10
11
12
13
14
15
16
17
18
19
20
21
22
23
24
25
26
27
28
29
30
31
32
33
34
35
36
37
38
39
40
41
42
43
44
45
46
47
48
49
50
51
52
53
54
55
56
57
58
59
60
61
62
63
server {
    listen 80;
    listen [::]:80;

    ## redirect http to https ##
    server_name ouestline.net;
    return  301 https://$server_name$request_uri;
}

server {
    listen 443 ssl http2;
    listen [::]:443 ssl http2;

    server_name ouestline.net;
    root /var/www/ ;

    ssl_certificate /etc/ssl/private/ouestline.net.fullchain.cer.pem;
    ssl_certificate_key /etc/ssl/private/ouestline.net.key.pem;
    ssl_session_timeout 5m;
    ssl_session_cache shared:SSL:50m;

    # As suggested by Mozilla : https://wiki.mozilla.org/Security/Server_Side_TLS and https://en.wikipedia.org/wiki/Curve25519
    # (this doesn't work on jessie though ...?)
    # ssl_ecdh_curve secp521r1:secp384r1:prime256v1;

    # As suggested by https://cipherli.st/
    ssl_ecdh_curve secp384r1;

    ssl_prefer_server_ciphers on;

    # Ciphers with modern compatibility
    #---------------------------------
    # https://mozilla.github.io/server-side-tls/ssl-config-generator/?server=nginx-1.6.2&openssl=1.0.1t&hsts=yes&profile=modern
    # Uncomment the following to use modern ciphers, but remove compatibility with some old clients (android < 5.0, Internet Explorer < 10, ...)
    ssl_protocols TLSv1.2 TLSv1.3;
    ssl_ciphers 'TLS13+AESGCM+AES128:EECDH+AESGCM:EECDH+CHACHA20:ECDHE-ECDSA-AES256-GCM-SHA384:ECDHE-RSA-AES256-GCM-SHA384:ECDHE-ECDSA-CHACHA20-POLY1305:ECDHE-RSA-CHACHA20-POLY1305:ECDHE-ECDSA-AES128-GCM-SHA256:ECDHE-RSA-AES128-GCM-SHA256:ECDHE-ECDSA-AES256-SHA384:ECDHE-RSA-AES256-SHA384:ECDHE-ECDSA-AES128-SHA256:ECDHE-RSA-AES128-SHA256';

    # Uncomment the following directive after DH generation
    # > openssl dhparam -out /etc/ssl/private/dh2048.pem -outform PEM -2 2048
    #ssl_dhparam /etc/ssl/private/dh2048.pem;

    # Follows the Web Security Directives from the Mozilla Dev Lab and the Mozilla Obervatory + Partners
    # https://wiki.mozilla.org/Security/Guidelines/Web_Security
    # https://observatory.mozilla.org/
    add_header Strict-Transport-Security "max-age=63072000; includeSubDomains; preload";
    add_header Content-Security-Policy "upgrade-insecure-requests";
    add_header Content-Security-Policy-Report-Only "default-src https: data: 'unsafe-inline' 'unsafe-eval'";
    add_header X-Content-Type-Options nosniff;
    add_header X-XSS-Protection "1; mode=block";
    add_header X-Download-Options noopen;
    add_header X-Permitted-Cross-Domain-Policies none;
    add_header X-Frame-Options "SAMEORIGIN";

    index index.php;
        location ~ \.php$ {
           fastcgi_split_path_info ^(.+\.php)(/.+)$;
           fastcgi_pass unix:/run/php/php7.2-fpm.sock;    # PHP7.2
           fastcgi_index index.php;
           include fastcgi_params;
           fastcgi_param SCRIPT_FILENAME $request_filename;
        }
}
Rechargement nginx
systemctl reload nginx
script .ssh/rc sur connexion SSH
Exécuter un fichier utilisateur nommé $HOME/.ssh/rc si présent
Pour tous les utilisateurs exécuter un fichier nommé /etc/ssh/sshrc si présent
Installer les utilitaires curl jq figlet
1
sudo apt install curl jq figlet
Le batch
1
2
mkdir -p ~/.ssh
nano ~/.ssh/rc
1
2
3
4
5
6
7
8
9
10
11
12
13
14
15
16
17
18
19
20
21
22
23
24
25
26
27
28
29
30
31
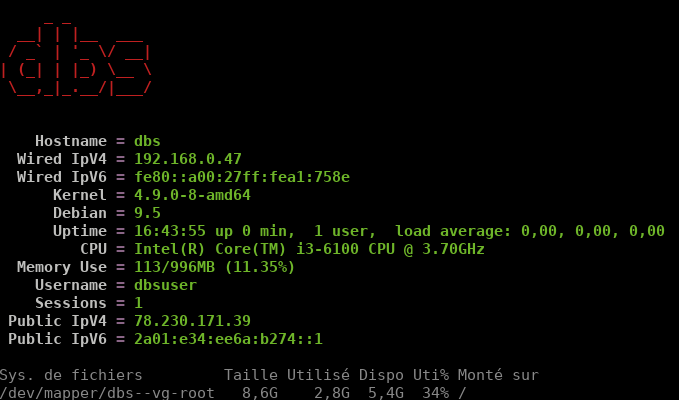
#!/bin/bash
#clear
PROCCOUNT=`ps -Afl | wc -l` # nombre de lignes
PROCCOUNT=`expr $PROCCOUNT - 5` # on ote les non concernées
GROUPZ=`users`
ipinfo=$(curl -s ipinfo.io) # info localisation format json
publicip=$(echo $ipinfo | jq -r '.ip') # extraction des données , installer préalablement "jq"
ville=$(echo $ipinfo | jq -r '.city')
pays=$(echo $ipinfo | jq -r '.country')
cpuname=`cat /proc/cpuinfo |grep 'model name' | cut -d: -f2 | sed -n 1p`
iplink=`ip link show |grep -m 1 "2:" | awk '{print $2}' | cut -d: -f1`
echo "\033[0m\033[1;31m"
figlet "`hostname --fqdn`"
echo "\033[0m
\033[1;35m \033[1;37mHostname \033[1;35m= \033[1;32m`hostname`
\033[1;35m \033[1;37mWired IpV4 \033[1;35m= \033[1;32m`ip addr show $iplink | grep 'inet\b' | awk '{print $2}' | cut -d/ -f1`
\033[1;35m \033[1;37mWired IpV6 \033[1;35m= \033[1;32m`ip addr show $iplink | grep -E 'inet6' |grep -E 'scope link' | awk '{print $2}' | cut -d/ -f1`
\033[1;35m \033[1;37mKernel \033[1;35m= \033[1;32m`uname -r`
\033[1;35m \033[1;37mDebian \033[1;35m= \033[1;32m`cat /etc/debian_version`
\033[1;35m \033[1;37mUptime \033[1;35m= \033[1;32m`uptime | sed 's/.*up ([^,]*), .*/1/' | sed -e 's/^[ \t]*//'`
\033[1;35m \033[1;37mCPU \033[1;35m= \033[1;32m`echo $cpuname`
\033[1;35m \033[1;37mMemory Use \033[1;35m= \033[1;32m`free -m | awk 'NR==2{printf "%s/%sMB (%.2f%%)\n", $3,$2,$3*100/$2 }'`
\033[1;35m \033[1;37mUsername \033[1;35m= \033[1;32m`whoami`
\033[1;35m \033[1;37mSessions \033[1;35m= \033[1;32m`who | grep $USER | wc -l`
\033[1;35m \033[1;37mPublic IpV4 \033[1;35m= \033[1;32m`echo $publicip`
\033[1;35m \033[1;37mPublic IpV6 \033[1;35m= \033[1;32m`ip addr show $iplink | grep -m 1 'inet6\b' | awk '{print $2}' | cut -d/ -f1`
\033[0m"
df -h /
#curl fr.wttr.in/$ville?0
Effacer motd
1
sudo rm /etc/motd
Déconnexion pusi connexion
Jekyll (générateur site statique)
![]()
Installation ruby + jekyll
1
2
sudo apt install build-essential ruby-full
sudo gem install bundler jekyll-feed
wikistatic
Installer dépendances Rmagick sur Debian
1
sudo apt install imagemagick ruby-rmagick # imagemagick-doc
Création dossier
1
sudo mkdir -p /srv     # création dossier
Les droits sur le dossier
1
sudo chown   $USER. -R /srv/
Clonage wikistatic par git
1
2
3
4
sudo apt install git
cd /srv
git clone https://gitlab.cinay.xyz/spm/wikistatic2.0.git wikistatic
cd wikistatic
Lancement “bundle” dans le dossier /srv/wikistatic pour la création de l’environnement
1
2
cd /srv/wikistatic
bundle
Les dossiers de l’hôte sont partagés sur la VBox debian
Modification et création des liens avec le partage VBox
Pour avoir les droits utilisateurs, on va monter “manuellement” les dossiers
1
2
sudo mount -t vboxsf -o uid=1000,gid=1000 ouestline-jekyll_posts /srv/wikistatic/_posts
sudo mount -t vboxsf -o uid=1000,gid=1000 ouestline-jekyllimages /srv/wikistatic/images
Pour un montage “automatique”, ajouter en fin de fichier /etc/fstab
1
2
ouestline-jekyll_posts  /srv/wikistatic/_posts vboxsf  uid=1000,gid=1000  0   0
ouestline-jekyllimages  /srv/wikistatic/images vboxsf  uid=1000,gid=1000  0   0
Tester le montage automatique
1
sudo mount -a  # ne doit pas générer d'erreur
Construire le site
1
2
cd /srv/wikistatic # aller au dossier avant construction
jekyll build  # construction du dossier statique _site
Créer le lien avec le site statique
1
sudo ln -s /srv/wikistatic/_site /var/www/static # lien avec configuration nginx
Générer le site statique automatiquement
Le dossier _site est regénéré à chaque création, modification ou suppression d’un fichier de type markdown dans le dossier _posts
Cette opération doit être lancée et en attente. Un bash et un service vont être utilisés.
Pour lancer le serveur Jekyll au démarrage , créer un bash sous /srv/wikistatic
1
nano /srv/wikistatic/start_jekyll.sh
1
2
3
4
5
#!/bin/sh
# Accès dossier
cd /srv/wikistatic/
# lancement jekyll en mode auto génération sans serveur
/usr/local/bin/bundle exec jekyll build --watch --source "/srv/wikistatic"
Droits sur le bash
1
2
sudo chown $USER. /srv/wikistatic/start_jekyll.sh
chmod +x /srv/wikistatic/start_jekyll.sh
Pour lancer le serveur Jekyll au démarrage, utilisation d’un service systemd
ATTENTION! , remplacer utilisateur par votre nom d’utilisateur (echo $USER)
Création d’un service jekyll sous systemd
1
sudo nano /etc/systemd/system/jekyll.service
Contenu du fichier
1
2
3
4
5
6
7
8
9
10
11
12
13
[Unit]
Description=jekyll Service
After=network.target

[Service]
Type=simple
User=utilisateur
ExecStart=/bin/sh /srv/wikistatic/start_jekyll.sh
Restart=on-abort


[Install]
WantedBy=multi-user.target
Lancer le service jekyll :
1
2
3
4
sudo systemctl daemon-reload
sudo systemctl start jekyll
#Vérifier:
sudo systemctl status jekyll
1
2
3
4
5
6
7
8
● jekyll.service - jekyll Service
   Loaded: loaded (/etc/systemd/system/jekyll.service; enabled; vendor preset: enabled)
   Active: active (running) since Wed 2018-08-29 18:47:45 CEST; 1 day 13h ago
 Main PID: 29680 (sh)
    Tasks: 5 (limit: 4915)
   CGroup: /system.slice/jekyll.service
           ├─29680 /bin/sh /srv/wikistatic/start_jekyll.sh
           └─29681 /usr/local/bin/jekyll build --watch
Valider le lancement du service jekyll au démarrage
1
sudo systemctl enable jekyll
Configuration nginx
fichier /etc/nginx/conf.d/static.ouestline.conf
1
2
3
4
5
6
7
8
9
10
11
12
13
14
15
16
17
18
19
20
21
22
23
24
25
26
27
28
29
30
31
32
33
34
35
36
37
38
39
40
41
42
43
44
45
46
47
48
49
50
51
52
53
54
55
56
57
server {
    listen 80;
    listen [::]:80;

    ## redirect http to https ##
    server_name static.ouestline.net;
    return  301 https://$server_name$request_uri;
}

server {
    listen 443 ssl http2;
    listen [::]:443 ssl http2;

    server_name static.ouestline.net;
    root /var/www/static/ ;

    ssl_certificate /etc/ssl/private/ouestline.net.fullchain.cer.pem;
    ssl_certificate_key /etc/ssl/private/ouestline.net.key.pem;
    ssl_session_timeout 5m;
    ssl_session_cache shared:SSL:50m;

    # As suggested by Mozilla : https://wiki.mozilla.org/Security/Server_Side_TLS and https://en.wikipedia.org/wiki/Curve25519
    # (this doesn't work on jessie though ...?)
    # ssl_ecdh_curve secp521r1:secp384r1:prime256v1;

    # As suggested by https://cipherli.st/
    ssl_ecdh_curve secp384r1;

    ssl_prefer_server_ciphers on;

    # Ciphers with modern compatibility
    #---------------------------------
    # https://mozilla.github.io/server-side-tls/ssl-config-generator/?server=nginx-1.6.2&openssl=1.0.1t&hsts=yes&profile=modern
    # Uncomment the following to use modern ciphers, but remove compatibility with some old clients (android < 5.0, Internet Explorer < 10, ...)
    ssl_protocols TLSv1.2 TLSv1.3;
    ssl_ciphers 'TLS13+AESGCM+AES128:EECDH+AESGCM:EECDH+CHACHA20:ECDHE-ECDSA-AES256-GCM-SHA384:ECDHE-RSA-AES256-GCM-SHA384:ECDHE-ECDSA-CHACHA20-POLY1305:ECDHE-RSA-CHACHA20-POLY1305:ECDHE-ECDSA-AES128-GCM-SHA256:ECDHE-RSA-AES128-GCM-SHA256:ECDHE-ECDSA-AES256-SHA384:ECDHE-RSA-AES256-SHA384:ECDHE-ECDSA-AES128-SHA256:ECDHE-RSA-AES128-SHA256';

    # Uncomment the following directive after DH generation
    # > openssl dhparam -out /etc/ssl/private/dh2048.pem -outform PEM -2 2048
    #ssl_dhparam /etc/ssl/private/dh2048.pem;

    # Follows the Web Security Directives from the Mozilla Dev Lab and the Mozilla Obervatory + Partners
    # https://wiki.mozilla.org/Security/Guidelines/Web_Security
    # https://observatory.mozilla.org/
    add_header Strict-Transport-Security "max-age=63072000; includeSubDomains; preload";
    add_header Content-Security-Policy "upgrade-insecure-requests";
    add_header Content-Security-Policy-Report-Only "default-src https: data: 'unsafe-inline' 'unsafe-eval'";
    add_header X-Content-Type-Options nosniff;
    add_header X-XSS-Protection "1; mode=block";
    add_header X-Download-Options noopen;
    add_header X-Permitted-Cross-Domain-Policies none;
    add_header X-Frame-Options "SAMEORIGIN";

    index index/;
	location / {
    }
}
Recharger le serveur nginx
1
sudo systemctl reload nginx